Santa Fe Tops

I’ve had a three-yard cut of black rayon-spandex jersey in my stash that has been taunting me for years. I hate sewing rayon-spandex jersey. It is shifty and floppy and impossible to cut out and fidgety to sew together, even with a serger. So I stopped buying it a long time ago, and had rooted all of it from my stash except this one remaining piece. I wear so much black jersey that a big cut of the stuff seemed too practical to get rid of, even if it was in a substrate that I didn’t like working with.

Hey June Santa Fe Top View C

When I was making my Avery leggings, I was finally inspired to just use the fabric up—I realized that I didn’t have great options for shirts to wear with my leggings and that some loose fitting black tees would make for a perfect combo. I decided to use the Hey June Santa Fe top. I thought the loose fit would be a good match for the rayon-spandex, given its ultra-clingy nature, and I liked that the pattern had several different views so I could make two different shirts without needing to pull out two different patterns.

In the end I decided to make View B, which is the tank top with the higher cut neckline, and View C which has cuffed, cut-on sleeves. I powered through cutting the pattern pieces out and, from there, the sewing was pretty straight-forward. I decided to press the center front and center back seams on both tops flat and then top-stitch on either side of the seam. It was more time-consuming and the top-stitching isn’t very visible but I prefer the way this approach helps control the seam allowance at these points.

Hey June Santa Fe Top View B

The necklines of both tops and the armholes of the tank top are all finished with a knit binding, which I actually prefer to a band finish. I just find that binding wears a bit better over time and actually seems a bit less tricky to sew. The pattern even calls for my preferred binding method, which made things that much easier.

My current bust measurement is 43”, so I made a straight 1X in both tops and sewed both views as is. I’m happy with the fit and feel of both tops and I know that I’ll get a ton of wear out of them. I’m also really happy to finally have that fabric out of my stash. Good riddance!

Jalie Dolman Top, Salvaged

This is the second saved project I alluded to when I blogged about my knit Stevie Top. The pattern is the Jalie Dolman top, which I originally made using the view with ¾ sleeves. It’s sewn in a really lovely marled sweater knit. I love this fabric so much—it washed up beautifully and it is lightweight, super-stretchy and very soft. I had grand visions of turning it into a basic pullover that I would wear all the time.

IMG_0284

My Jalie Dolman top originally

But the reality of my first version of this top was something that I just didn’t like at all. There was too much ease in the sleeves. I felt like the drop-shoulder style looked weirdly sloppy on me, despite the fact that it’s a style I typically like a lot. And the neckline was so wide that I was flashing bra straps every time I put it on. I was incredibly disappointed to have wasted such nice fabric on another flop.

Jalie Dolman Top

But like the pinstripe jersey I used from my second Stevie Top, my love for this fabric led me to hold onto the failed project and the scrap fabric much longer than I otherwise would have. And I would pull the pieces out from time to time to puzzle over how I might salvage the project or recut the fabric to get some kind of wearable garment. It was a tough puzzle to solve—I pinned out the excess in the sleeves in the hope that I would like the result better, but it didn’t make a substantive difference. I tried cut another pattern out of the scraps and the larger pieces of the top, but I could never seem to make it work. I considered finding a complimentary sweater knit that I could use to create a color-blocked project, but couldn’t seem to find either a second fabric or a good pattern that would result in something I’d like.

fullsizeoutput_645

I very nearly gave up when I was reading a blog post by Meg at Cookin’ and Craftin’ about a t-shirt she’d made for her sister and was shocked to see that she’d made it using a sweater knit. It had simply never occurred to me to use a sweater knit for a short-sleeved, warm-weather garment. Apparently, in my mind, sweater knits could only be used for traditional sweater-like garments with longer sleeves that are meant to be worn in cold weather. Talk about a ridiculous limiting belief. I thought about this lovely marled, gray sweater knit—which is a lightweight rayon blend that would be very nice in warmer temps—and wondered if I could get a tee out of the scraps I had left.

fullsizeoutput_644

I couldn’t. But at some point in the middle of trying unsuccessfully to get all the pieces of my favorite tee pattern out of the little bits of fabric available to me, I finally recognized the very clear and obvious solution: just cut the damn sleeves off. All other attempts to salvage the fabric had failed, so I recklessly cut of the sleeves about an inch from the seam. (Trying to unpick the sleeves would have taken forever and would have seriously marred the fabric.) Then I treated the remaining bit of former-sleeve fabric as a find of facing, turned it to the wrong side of the garment, and top-stitched it in place. Voila. It took me more than a year to basically just make the easier view of the pattern. So it goes.

My original thought in cutting the sleeves off was that even though the neckline was too wide, I’d be fine to wear this as a shell under a jacket. But without the weight of the sleeves, the neckline doesn’t pull in the same way so I’m no longer flashing my bra straps. So now I have a multi-season top that I can wear as is or under a jacket, and I finally get to enjoy the soft sweater knit that has just been languishing in my stash for way too long. Another win.

fullsizeoutput_95d

Stevie the Second: Jersey Edition

A long while ago, I attempted two different projects with two beloved pieces of fabric and I managed to screw them both up. It was so incredibly disappointing to look at those failed projects and think about all the things I wish I would have done differently. But the fact that I loved the fabrics also made me hold onto them for much longer than I probably would have otherwise while I puzzled through a possible salvage operation.


Tilly and the Buttons Stevie


It took about 15 months, but I finally figured out how to get a wearable garment from both projects, starting with this shirt. While I was still working on my tulip-print Stevie Top, I ended up moving my fabric stash into a new storage cabinet and, in the process, found myself puzzling over the remnants of this gray and black pinstripe jersey and wondering how I might get some kind of top out of the pieces.

fullsizeoutput_62f

This jersey is from Mood and it feels lovely—it’s a cotton, rayon blend that is soft and completely opaque while still being lightweight. It also has very little stretch—maybe 15% at most—which makes it a poor candidate for a lot of the knit top patterns I have. I didn’t really have enough fabric to make something with sleeves but also didn’t think I would get much wear out of a tank top. I started wishing I had a knit pattern in a style similar to the Stevie top when I realized that the Stevie pattern would probably easily work with a fairly stable jersey.

IMG_9905

The only significant change I made to the pattern was to eliminate the back closure, cut the seam allowance off the center back yoke, cut the yoke on the fold, and then redraw the back facing piece to match the new yoke. I kept the top-stitched facing because I thought the detail of the stitching would complement the fabric and the style. I wanted to keep the back yoke because it made it easier for me to work with the fabric scraps I had on hand, but I also wanted to play around with the direction of the stripes, so I cut the lower back with the stripes going vertical. I had just enough fabric to cut out the pocket piece, so I added that to the front for just a bit more detail.

IMG_9907

I love the resulting shirt. It’s not perfect—the floppiness of the fabric means I had to tack the sleeve cuffs down in a few places, sometimes the facing and necklines wrinkles a bit at the neckline, and the pocket has a tendency to sag. But there’s something about the whole look of the shirt, including its imperfections, that just looks cool and casual and modern. It’s really just a t-shirt, but it makes me feel fancier than any other t-shirt I own.

fullsizeoutput_629


I’m so happy that I’m getting to enjoy this fabric now, and even happier that I’ve turned a failed project into a big win.

Tulip Print Stevie Top

Just a couple of weeks after Jude was born, while I was still fully immersed in the post-partum haze, I did some ill-advised online fabric shopping. The history of this blog shows that I primarily sew knits. It furthermore shows that I primarily sew solids, mostly in neutral colors. And yet, despite these clear preferences, I order several lightweight woven fabrics in prints—some florals, some novelty prints, some bright colors. Why? I have absolutely no idea. But I do know that I now have 2 yards of a blue flamingo print rayon voile that I have no plan for.

Tilly and the Buttons Stevie Top

Maybe my post-partum brain could see something my rational, rested brain could not. Because I used this tulip-print rayon challis from Cotton + Steel to make the Stevie Top from Tilly and the Buttons and it’s become one of my favorite garment projects to date.

fullsizeoutput_63e

I made the largest size in the pattern, which is labeled a size 8 and fits a 44” bust. I skipped the bust pocket and used a button loop closure rather than the back ties. I lengthened the body by 1″ but otherwise made the pattern as is.  This was simple, straight-forward, pure pleasure sewing. I love that the facing is stitched down—it means the facing isn’t flopping around but I also like the way the top-stitching looks. The boxy fit with the cuffed, cut-on sleeve is probably my favorite warm-weather style right now, and I wish I had a whole closet full of shirts like this for summer.

IMG_5856

The Cotton + Steel rayon was really easy to work with and the weight and drape is perfect for this top. The simple style lines of the Stevie make it a perfect pattern for a larger scale print. I honestly did not think I would ever enjoy wearing a floral top this much, but I feel very comfortable and very much like myself when I wear this. I’m so pleased with this shirt, I wore it to Convocation, which kind of made it my back-to-school outfit for this year.

IMG_5854

What will become of the other prints in my stash? I have no idea. I know that a lot of sewists find prints super inspiring to work with, but anything more adventurous than a minimalist, monochrome motif seems to really stress me out. And yet, I can’t seem to just get rid of these fabrics. So I’ll keep staring at them and keep looking for the right pattern and maybe in another 10 months, I’ll hit the project jackpot again.

fullsizeoutput_63d

Confidence Building: The Willamette Shirt

Many months ago during Me-Made May, I pledged to spend at least 20 minutes a day sewing things for myself with the goal of getting myself back into the habit of sewing after a long post-baby break. I mostly kept the pledge, only missing a few days, and it worked—I’ve been sewing pretty regularly since then, which feels awesome. Making that pledge prompted me to finish up the striped cardigan I’d started working on a year earlier. The other big project I finished in May was this shirt.

fullsizeoutput_634


This is the Willamette shirt pattern from Hey June patterns. I kind of started this project on a whim after seeing a couple of people on Instagram sew up the pattern. I’ve been preferring boxier, woven shirts to my usual t-shirt lately and I really liked the casual, easy style of the Willamette. And while I have been intending to get into shirt making for years at this point, the truth is that I find both the idea of fitting woven tops and the process of sewing a button-up shirt completely intimidating. The Willamette seemed like it would be forgiving on both points.

fullsizeoutput_636

I sewed View B up in some black cotton voile I had in my stash. Based on the sizing advice in the pattern, I made a size 16 with a 1” FBA. It has been a long time since I’ve done an FBA, and I managed to screw it up a bit and wound up with a dart that’s too low. I figured out where I went wrong so I won’t do it again, and I think the black fabric conceals the issue for the most part.

I do wish that I had spent a bit more time thinking about the relationship between sizing and fabric. After I finished my Willamette, I saw someone talk about deciding to make this pattern one size smaller than their measurements indicated to account for a fabric with more body—this is what I really should have done. I think I would love the ease in this pattern with a more fluid fabric like rayon challis, but the cotton voile is stiff enough that it kind of stands away from my body, which makes all of the extra ease feel very awkward.

fullsizeoutput_637

I was really excited about this shirt when I finished it, but I’ve actually only worn it once and even then I changed out of it after a couple of hours. I’ve really only recently started wearing woven shirts more recently, so I’m still learning what I like in terms of fit and fabric. I do like a boxy and slightly oversized fit, but I want it paired with a softer and more fluid fabric, which is not what this voile is.

fullsizeoutput_640

However, this project was a huge confidence builder for me. It kind of reminds me of when I made the Jalie Eleonore Jeans—the project itself was a complete failure, but it showed me that I was capable of doing all the basic sewing tasks required to make an actual pair of jeans, which I ultimately ended up doing. In the end, I don’t like the way this shirt looks or feels on me, but it has helped me get over the weird anxiety I’d built up around fitting and sewing a button-up or popover shirt. I can see now that I am competent enough to take a shirt project on, and I’m excited to do that soon.

fullsizeoutput_633

I’m also really looking forward to trying this pattern out again next summer with a rayon or linen fabric that I think will better suit my personal preferences. I’m becoming a big fan of Hey June patterns (I’ve made the Halifax Hoodie twice and have two versions of the Santa Fe top waiting to be blogged). The quality of the drafting and the instructions is great and the casual, laid-back style is right up my alley.

Style Arc Mandy Maternity Top

When I found out that I was pregnant, I had no interest in sewing maternity clothes. Then I remembered that making my own t-shirts has ruined RTW tees for me. And then I bought my first terrible pair of maternity jeans (which required 20 minutes worth of alterations to simply stay on my body while I walked), and I figured the time spent sewing a few maternity items might be well worth it.

The sewing world is not overflowing with maternity patterns, which makes sense given that you are sewing to suit a relatively short period of time and given the lack of energy a lot of pregnant people experience. A lot of the available options seem to be skirts or dresses, which I don’t wear. The most widely reviewed patterns seem to be those from Megan Nielsen’s maternity pattern collection. But her patterns are a bit too feminine for my tastes and, more importantly, the size range is pretty limited and I’d be busting out of the top end of it.

IMG_0246

In the end, I decided to try the Style Arc Maternity Bundle, which comes with the Mandy Maternity Top, the Andy Maternity Pants, and the Maternity Bandeau pattern. These patterns are very much basic wardrobe staples and are available in sizes 4-30. I’m in the process of trying out the Andy Pants pattern, but I’ve made several of the Mandy Tees and I’m really happy that I gave the Style Arc bundle a try. As far as I can tell, the only way that you can get these patterns is to order printed copies through the Style Arc site—they don’t appear to be available via Etsy or Amazon, unlike other Style Arc options. Despite paying for international shipping from Australia, I found that buying printed copies of the patterns was really affordable (especially since they throw in the free pattern of the month when you order directly from them). With the bundle price and the free pattern, I ended up getting four patterns for just over $30 USD and received the patterns in less than three weeks time.


Style Arc Mandy Maternity Tee

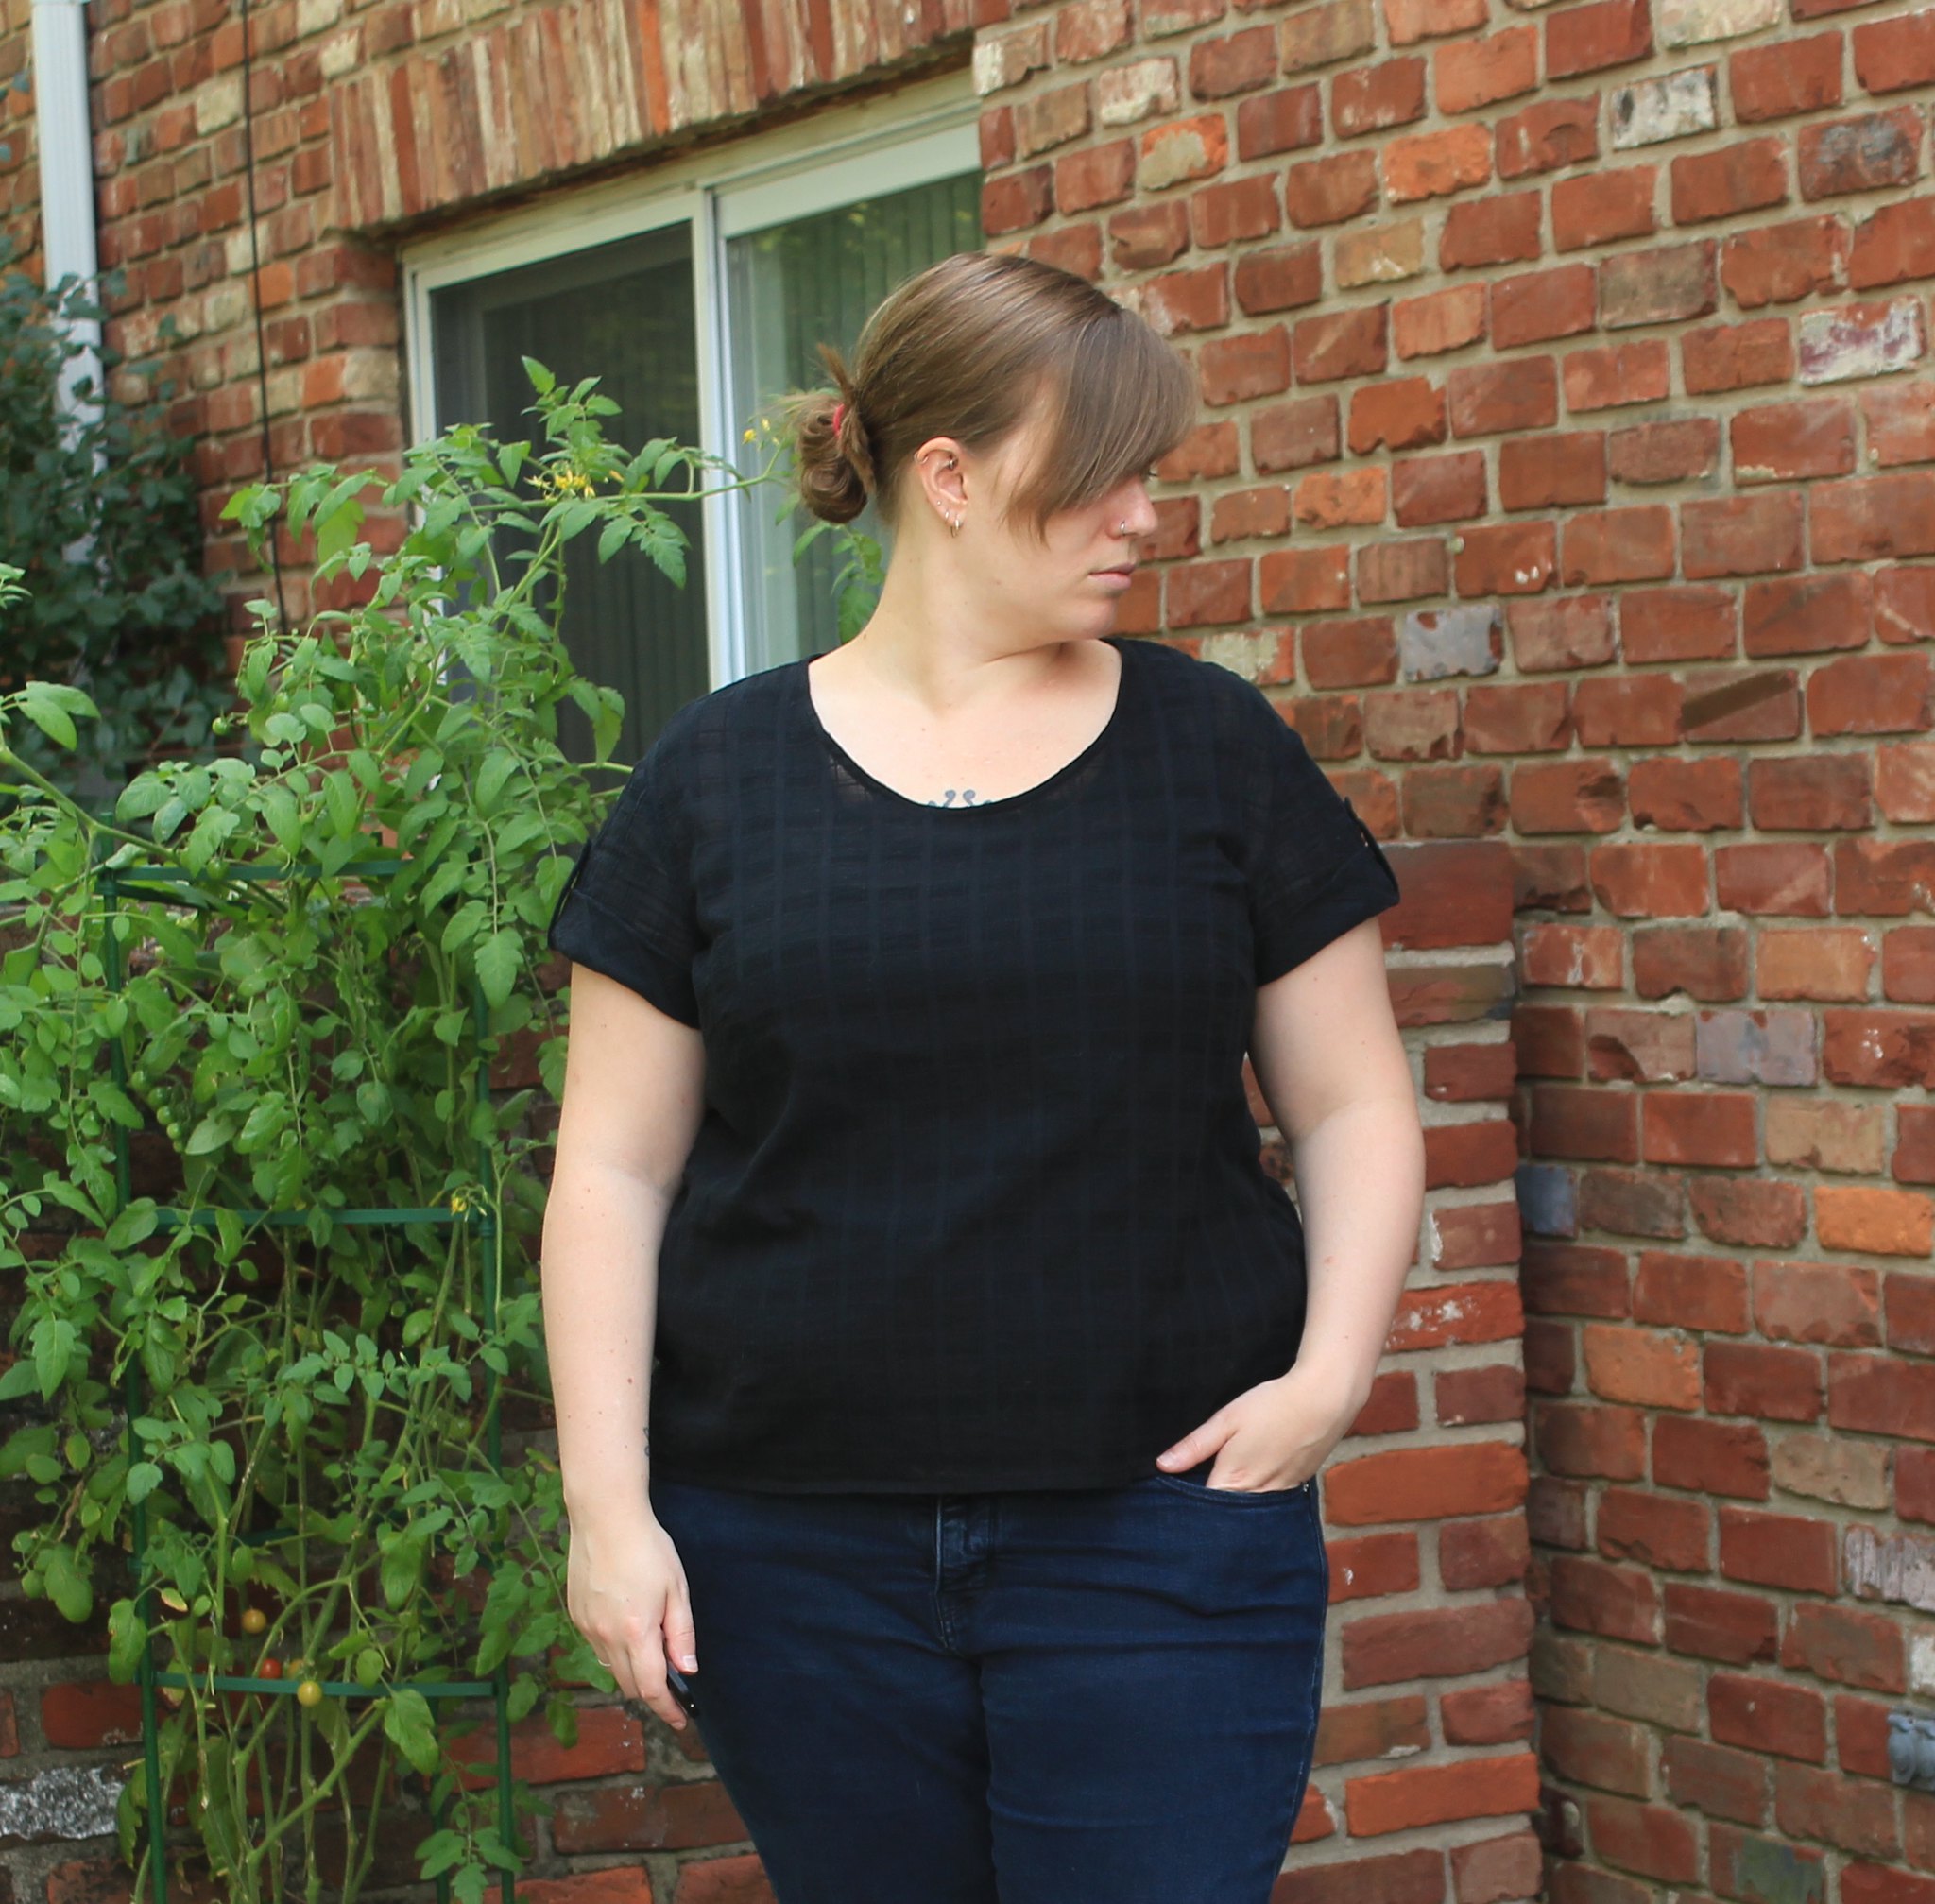
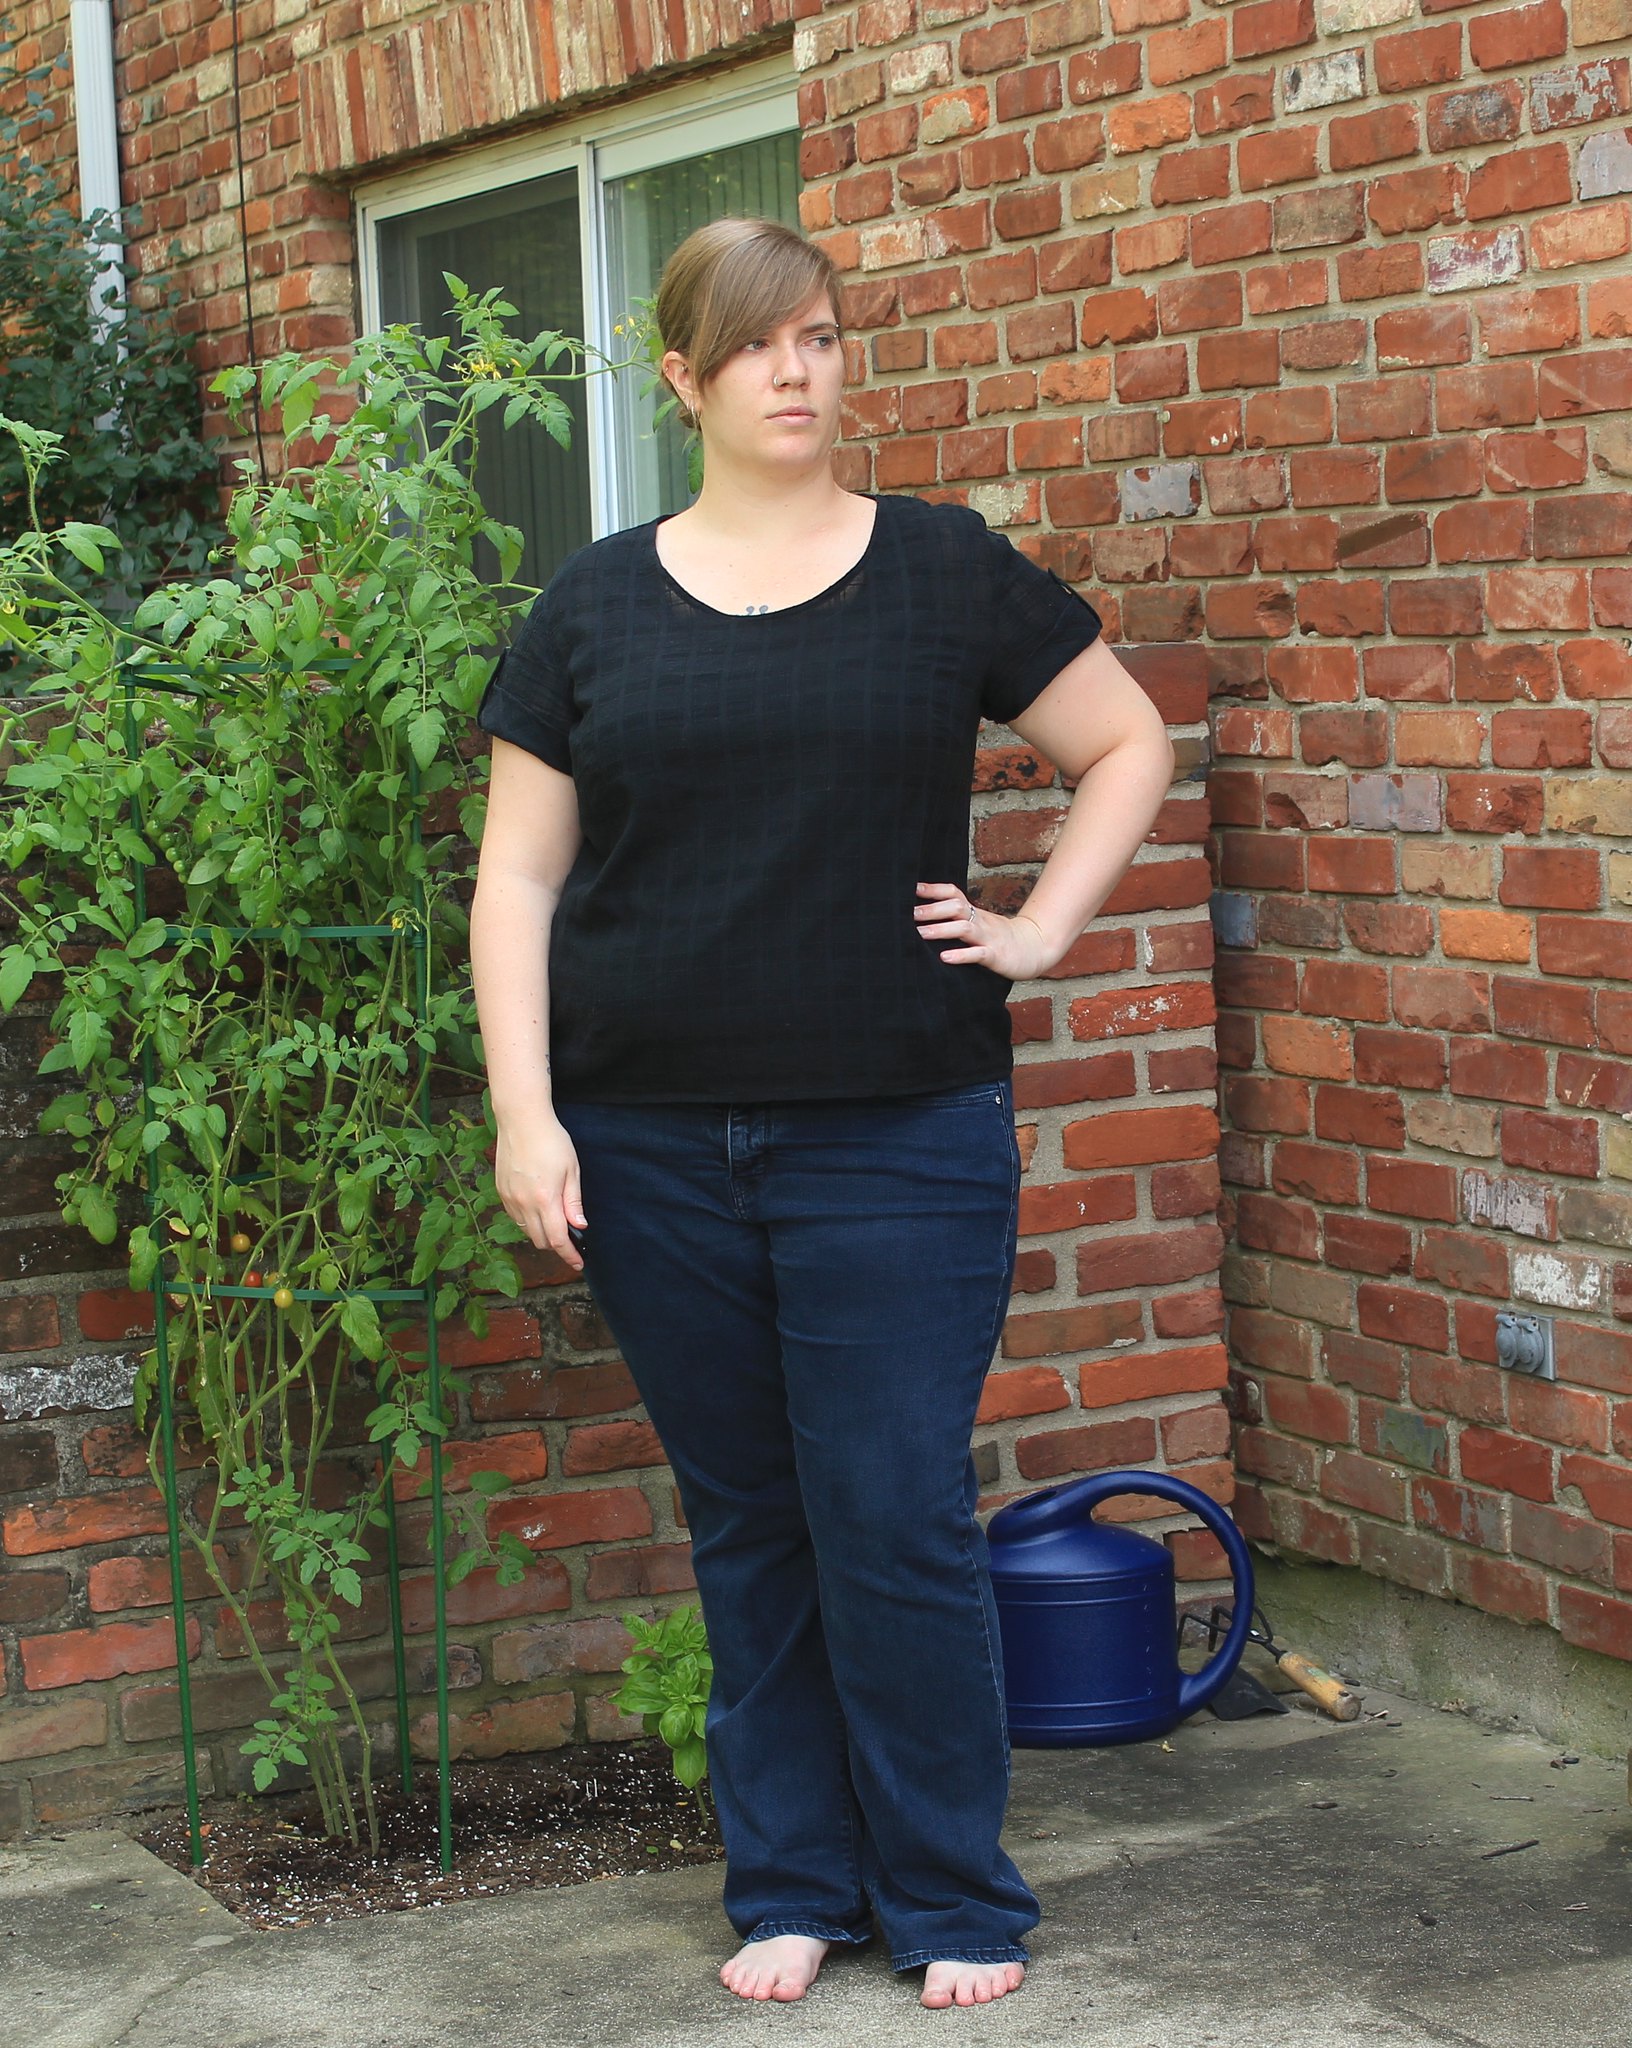
The Mandy Tee comes with options for long or short sleeves. I need these for warm weather, so I only made the short-sleeved version. The length on the sleeves is perfect for me, and I’m pleased with the shape and depth of the scoop neckline. I made all of my shirts out of Telio bamboo/Spandex jersey I ordered from Fabric.com.

IMG_9098

Honestly, the fabric alone makes sewing my own maternity tees totally worth it. The bamboo jersey is thicker and more opaque than every rayon jersey I’ve encountered while still feeling light and cool to wear—much cooler than a cotton-Spandex blend. Plus, it’s super soft but isn’t prone to pilling in the wash, which is perfect for shirts that I’m going to wear all the time given my limited wardrobe options.

Style Arc Mandy Maternity Tee

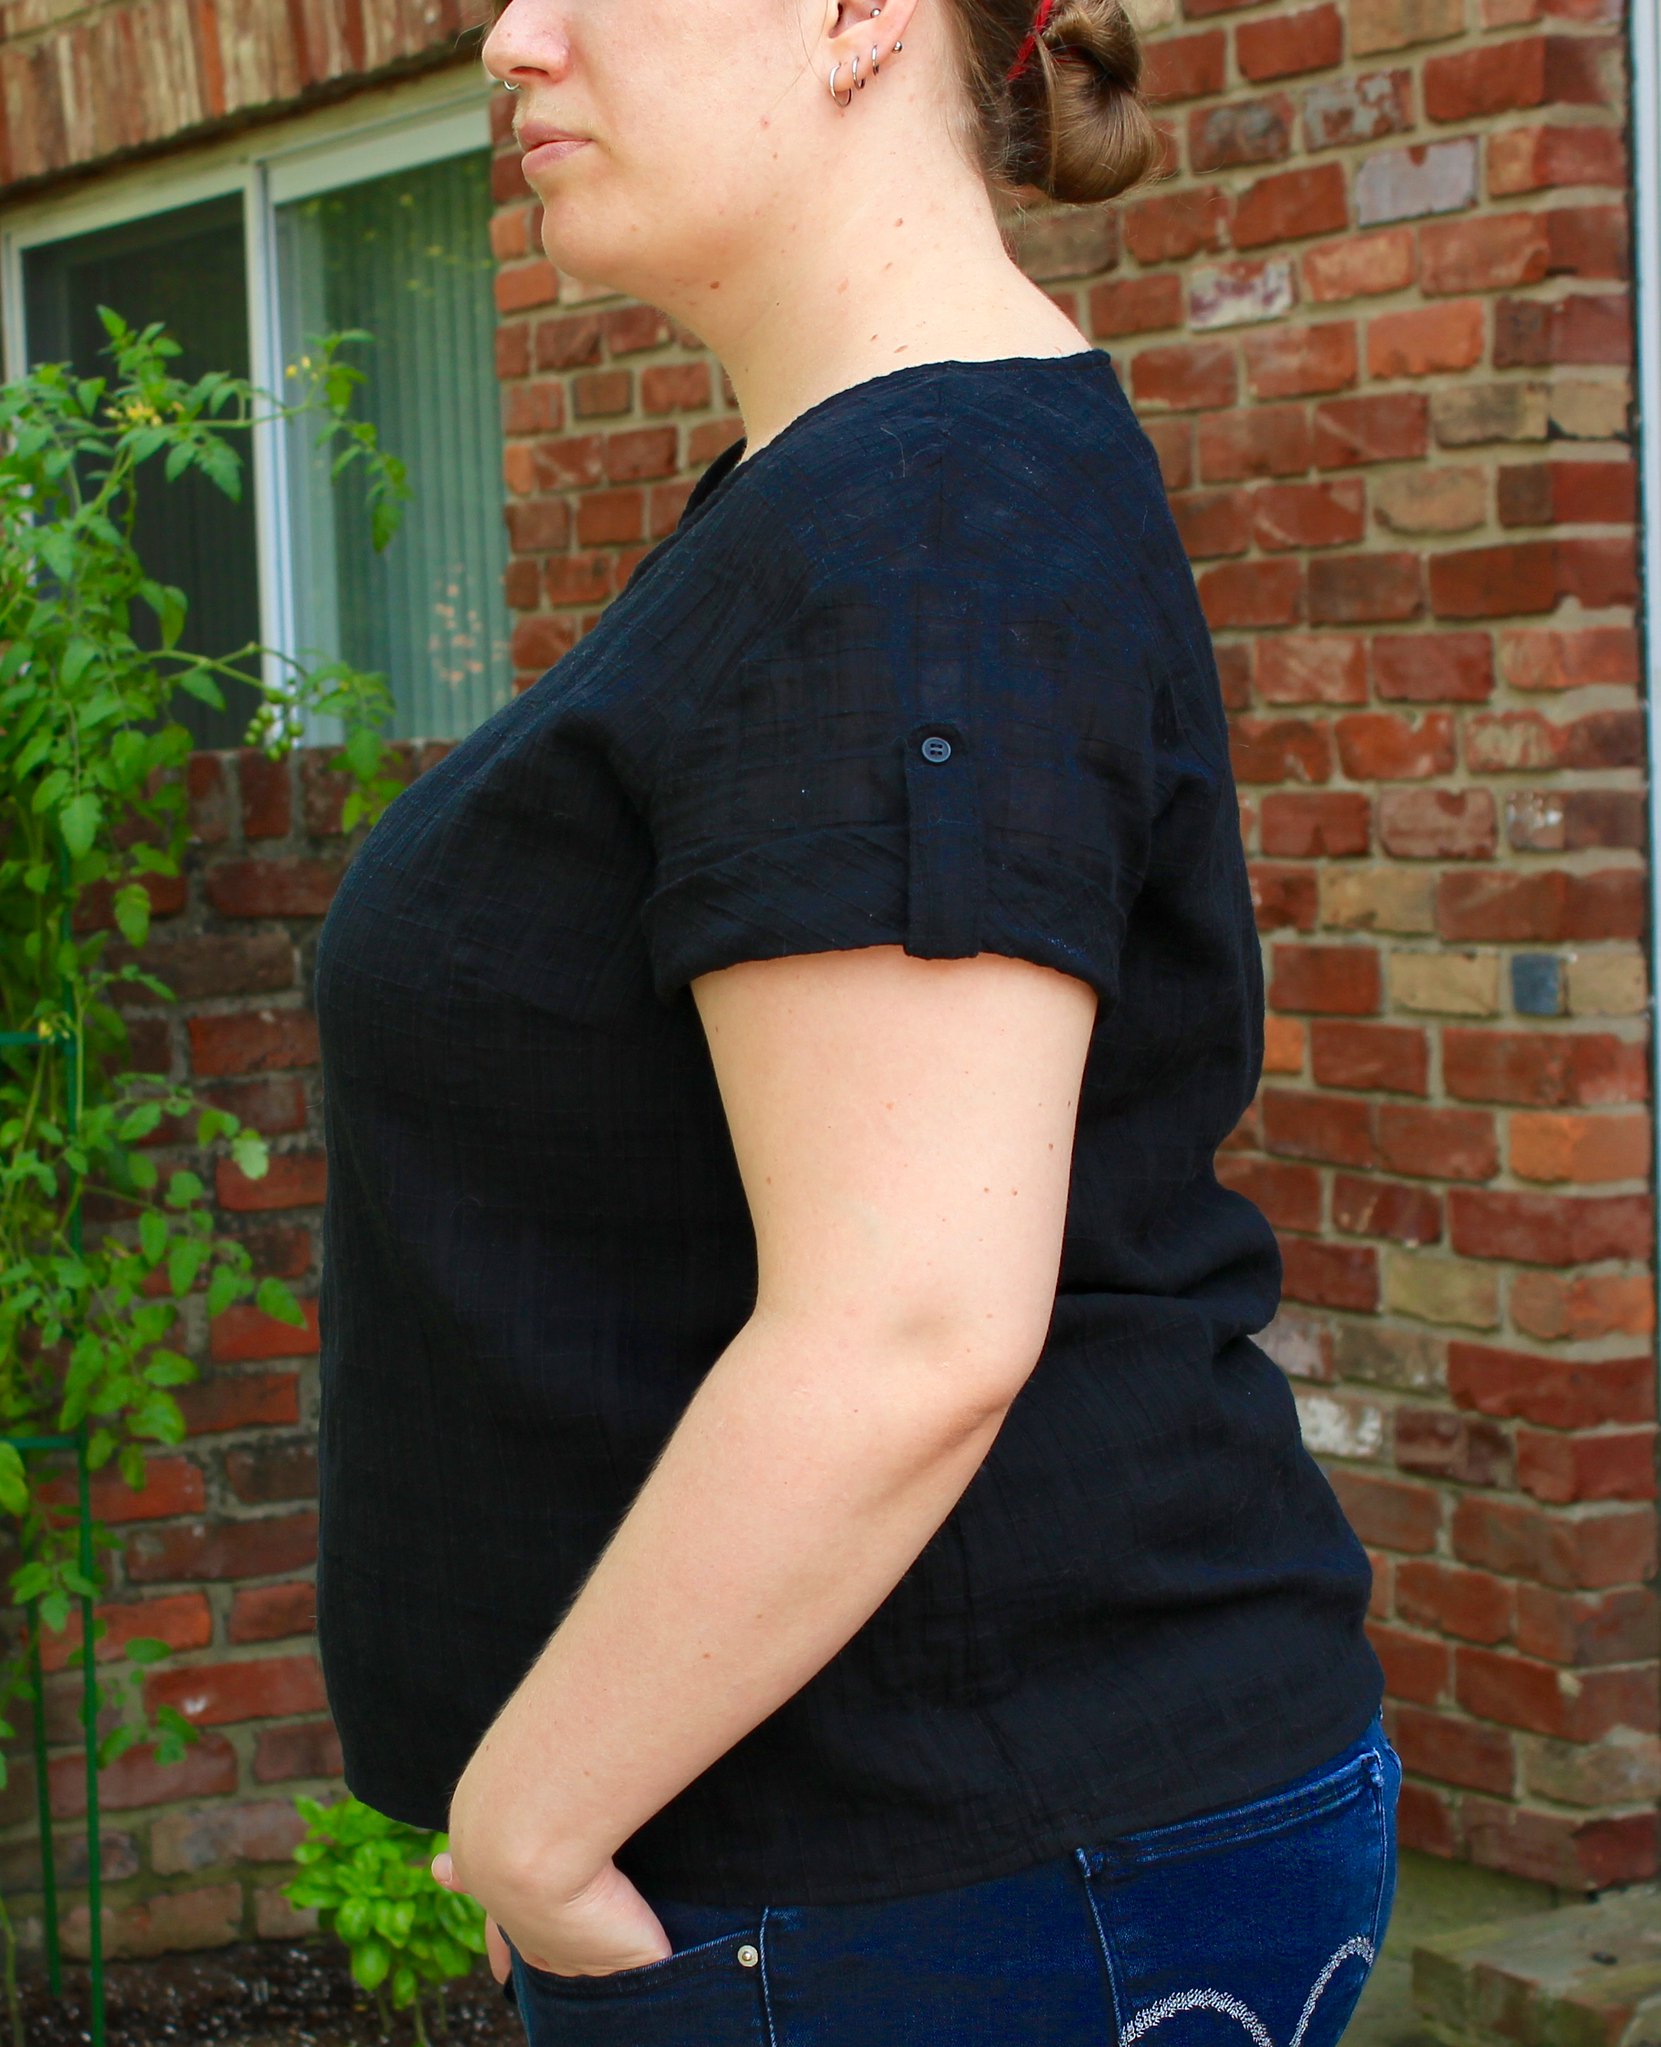
These tees are really easy to sew, even with Style Arc’s sparse instructions. You are basically just making a really long t-shirt and then gathering a portion of the side seams by sewing in a short length of elastic. To do this last step, I sewed the side seam on my regular machine rather than the serger and pressed the seam open. Then, starting toward the bottom of the shirt, I anchored the end of the elastic in place, stretched a small bit of the elastic out along the seam and sewed it in place with a zigzag stitch, and then repeated the process until I got to the end of the elastic.

I used ¼” elastic rather than the 1/8” elastic called for in the pattern simply because it was what I had on hand, but I think the slightly wider elastic was easier to control. The gathered part of the shirt looks pretty lumpy and gnarly when you first pull it off the machine, but it relaxes nicely with a healthy shot of steam.

Style Arc Mandy Maternity Tee

I was worried that the exposed elastic on the inside of the shirt would be irritating and that the visible zigzag stitching at the side seams would be ugly, but neither is the case. I don’t feel the elastic at all and the zigzag stitching is hardly visible since it gets lost in the gathering of the fabric. I actually have a few maternity tanks from Old Navy that have a serged side seam and then have been gathered at the sides with clear elastic sewn to the serged seam allowance. There’s no visible stitching on the outside of those tops like there is on these, but the side seam is much bulkier and the elastic can feel a bit irritating. So that’s all to say that I much prefer the finish of these tees.

IMG_9083

The downside of the printed Style Arc patterns is that they only come in one size, so you don’t have the option of grading between sizes. I just went ahead and ordered the size 16 for the t-shirt pattern based on my measurements at the time (I was nearing the end of my first trimester). I am usually pretty diligent about doing flat pattern measurements to figure out if I need extra width at the hips or at the bicep, and I usually consider doing at least a small FBA. But I completely forgot about all that business when I went to make this pattern up and just cut out a straight 16. Luckily, I’m pleased with the fit. The shirts are comfortable, they look good, and I feel like I have enough room to continue wearing these throughout the more ungainly stages of late pregnancy.

IMG_9137

Here’s hoping I have a similarly positive experience with the Andy Pants!

Sewing Fails: Jalie Dolman and Ottobre Statement Tee

Whenever I take a long break from either sewing or knitting, I experience a lot of stumbling and fumbling when I pick it back up again. It’s like I haven’t forgotten how to “ride the bike,” so to speak, but I’m pretty wobbly for a while. This wobbliness resulted in two failed projects (one of which didn’t even get finished) when I started sewing again mid-March.

The first failed project was a version of the Jalie Dolman Top (Jalie 3352) that I made with a really nice marled sweater knit—I’m fairly certain the fabric is a cotton/rayon/Spandex blend. It’s soft, lightweight but still opaque, has great drape, and washed and dried really well. I originally bought it with the intention of making a long-sleeved Concord Tee so that I would have just a basic, lightweight sweater in my closet. I’ve been kind of kicking myself for changing plans, but whatever.

Jalie Dolman

I don’t like this pullover. I’ve worn it a couple of times and it just feels sloppy to me. I think there are two primary issues at play: first, the fabric has substantially more stretch than the pattern calls for (~75% vs. 40%); and second, I made some ill-advised sizing choices in the hopes of getting something that would be more wearable during the spring as I moved into my second trimester and then again in the fall in the middle of unpredictable post-partum fluctuations. (This was also the logic that led to the pattern switch—I thought the looser style of the Jalie Dolman would be more wearable than the fitted style of the Concord. The overall lesson here has been that it really isn’t worth it to try to predict what my body will do or what I will want to wear in the future.)

IMG_0287

Given the stretch in my fabric, I think I would have been best off cutting a size down from my measurements. But what I actually did was cut a size larger than my measurements. The result is something that just doesn’t feel good on me and that I don’t enjoy wearing. The body feels completely shapeless and dowdy and the sleeves are too loose and long—it basically looks nothing like the pattern photos or other people’s finished projects suggest it should look like. To add to the frustration of this project, my twin needle gave me a hell of a time and kept skipping stitches and breaking threads, which really made me feel like I had no idea what I was doing at my sewing machine anymore.

IMG_0282

The twin needle issue was easily solved—I realized about a week later that I just needed a new needle. I ordered one and all my twin needle problems are magically gone. As far as the pullover goes, it’s still hanging in my closet, and I think at some point I will take apart the side and sleeve seams and either recut it as a smaller size or just take the whole thing in. But there’s no sense in even trying to do that right now. And who knows—maybe it will actually fit well in the fall and I’ll get a lot of wear out of it.

IMG_0397

My second failure was the Statement Tee pattern from the Spring 2017 issue of Ottobre Woman. I was drawn to this pattern for the relaxed fit and because it is drafted for more stable jersey fabrics. However, I didn’t even end up finishing the first tee I made because I hated the fit on me. I found that the neckline on this is really wide. I added a neckband instead of the binding called for to get a bit more coverage and still ended up with a neckline wide enough to allow for frequent peeking bra straps. The sleeves are also quite long (which, to be fair, is more or less indicated by the fact that the pattern photos show the tee worn with the sleeves rolled up) and I would have to cut off ~2″ to get the length I want. Plus, I think it is too short in the body for this style—something I found especially surprising since I have a long torso and Ottobre tops are still usually a bit on the long side for me.

IMG_0395

The unhemmed tee

There were enough issues and frustrations with the fit and style of this pattern that it just didn’t feel worth finishing right now. The failure of the project is mostly due to the pattern, which just wasn’t what I was expecting it to be. The real clumsiness on my part as a sewer was the fact that I cut out two of these tees before testing the fit of the pattern in any way. This gray fabric is no great loss at all since it is boring and inexpensive. But I cut the second tee from a really nice black and gray pinstripe cotton-rayon blend jersey from Mood that is super soft and lovely. So I’m really kicking myself for now having sacrificed two nice cuts of fabric to failed projects.

IMG_0394

The sadly cut up pinstripe jersey

Ultimately, I think I’ll have enough of the pinstripe jersey leftover to be able to get something out of the fabric, although I don’t know what that will be yet. And again, maybe I’ll pull this t-shirt out of my project basket at some point in the future and find that it’s totally wearable and worth finishing. Either way, I’m happy to report that this was basically the end of my sewing wobbliness and I’ve had a lot more success at the machine since.

Pacific Leggings and McCall’s 7386 Tank

Behold, my third pair of black pants in a row. I made a pair of lounge pants, then a pair of jeans, and now: activewear. And it’s activewear meant for actually being active in–I promise that I have not worn these pants while laying on the couch or while doing my weekly grocery shopping.

Sewaholic Pacific Leggings and McCalls 7386

These are the Sewaholic Pacific Leggings. I made view C, but added two inches to the bottom of the leg to make them more of a cropped length rather than capri length. I also added the yoke pocket from View B.

Sewaholic Pacific Leggings

My current waist and hip measurements match the size 14 almost exactly, so I cut a straight 14 and made no pattern adjustments beyond lengthening the leg a bit. Overall, I’m really happy with the fit for a first go with this pattern. My only issue is that I’d like the waistband to sit a bit higher. I sewed the waistband with a smaller seam allowance to give myself a bit more height and while the rise is high enough to wear comfortably, next time I’ll add an inch to the rise of the front and back pieces.

Sewaholic Pacific Leggings

The fabric is a black poly/Spandex activewear knit I bought from Fabric.com. It’s a nice medium weight that is very shiny on the right side and a bit more matte on the wrong side. I decided to use the matte side of the fabric as the right side since I’m not into shiny pants. I wanted to try to highlight the seaming on the pattern, but didn’t want to do something like top-stitching in a contrast color. So for the outseams and the waistband seam, I decided to serge the seam wrong sides together, press the serged seam to one side, and then top-stitch it down. The result is an exposed seam finish that looks a bit like a faux-flatlock stitch. I just used a straight-stitch to top-stitch the seams to one side, and it is surprisingly stretchy. I’ve pulled these on and off multiple times and moved around a lot in them and haven’t had any popped stitches.

img_8833

I wore these on a long hike this past weekend, and they were very comfortable. It’s been many years since I owned activewear other than cotton-spandex yoga pants, and these leggings are infinitely nicer than anything I’ve owned before. The waistband fit is perfect for me. I usually have a hard time keeping any kind of elastic waistband from sliding down my hips but this waistband fits firmly and stayed in place throughout our hike.

Sewaholic Pacific Leggings and McCalls 7386

I also made the tank top I’m wearing here. (Although please ignore my embarrassing farmer’s baseball spectator tan, acquired during an intensely sunny Reds game over Labor Day weekend.) I’ve been looking for a basic tank top pattern that does NOT have a racer back, which is surprisingly hard to find. I ended up buying McCall’s 7386, which is a “learn to sew” pattern with options for a basic knit tank, skirt, and tank dress.

img_8840

I cut a L for the upper body and blended out to an XL through the waist and hip. The tank top, as drafted, is pretty short, so I added 3″ to get a low-hip length. I had to take a small wedge at the side seam under the arm to get a better fit in the armhole, but otherwise the fit is good. The pattern has a shaped back seam, which gives a close, curvy fit through the back. It’s a nice detail to include on a very basic pattern like this.

McCalls 7386

The pattern instructions call for finishing the armholes and neckline with a simple turn-and-stitch hem. I wanted a more professional-looking finish so I tried the skinny knit binding method described in this post from Sew Fearless. I pretty much followed her tutorial, although I didn’t fold the binding under as I sewed. I’m just not that coordinated. Instead, I pinned the binding in place so I could just focus on making sure my topstitching was even. This is probably the nicest finish I’ve managed on a knit top to date, and the skinny binding is definitely a technique I’ll use again.

Skinny Knit Binding

The fabric I used is a cotton/rayon/Spandex jersey I got from Girl Charlee at the beginning of the year. Their jerseys can be a bit hit or miss and this is one of the nicer ones I’ve bought–super soft, lightweight but not sheer, drapey but not clingy.

Overall, I’m really happy with both of these pieces. I’ve been hiking and walking enough recently that I should probably be making more things like this!

img_8827

Black Fog

My current sewing project selection process is to simply sew whatever seems interesting to me at the moment. I’ve given up on making sewing plans since I never stick to them. I think when I’m in the process of planning, I tend to be very practical, privileging whatever projects I would most benefit from having in my (very lean) closet. But then when it comes time to actually sew, I find myself completely bored by the practical. The other thing that kills my plans is that my style is changing a bit. When I’m making plans, I end up talking myself out of some of the different cuts and style lines that I find myself drawn to right now and instead come up with lists of projects that reflect the kinds of things that I’ve been safely wearing for years but am now bored with.

ottobre 02-2016

Anyway. When I got the newest issue of Ottobre Woman, I was a little put off because it was pretty much full of things that I cannot ever imagine wearing. Skirts and dresses are always a hard pass for me, but I also hate jumpsuits, anything with a peplum, and especially any kind of cold-shoulder shirt. There are a couple of basic designs in this issue that I might make at some point if I come across the right fabric, but the only thing that immediately jumped out at me was design #5—the Fog Jersey Blouse.

Ottobre Woman 02/2016 Fog Jersey Blouse

This shirt is an A-line tee with a shaped hemline that is basically cropped length at the front. It also has invisible zippers at the side seams, so you can open the side seams up for a deep split. I’m not really sure what drew me to this design, except that I liked the way it hung with the zippers open and that it seemed to strike a nice balance of minimalist with a bit of interest. Regardless, it was what I was interested in sewing, so I didn’t think too hard about the practicality of zippers at the side seams or the fact that I would probably never try on a shirt like this in the store or about whether the neckline was deep enough to be “flattering” for me. I just traced the pattern off and sewed it up in some black cotton jersey I had on hand.

IMG_7635

As far as sizing goes, I traced a size 46 for the shoulders and blended out to a 48 under the arm. The only adjustment I made to the pattern was to shorten the sleeves by 2” to get a true ¾ sleeve length. The magazine describes the sleeves as “cropped,” which I think means that they are sort of bracelet length? It’s hard to tell because the sleeves are pushed up on the model.

IMG_7620

Neckline detail, complete with all the fuzzies black fabric inevitably attracts

IMG_7618

Invisible zipper, partially undone

The neckline is faced with a strip of binding, which results in a nice, clean look. (And it turns out that I really like the shape of the neckline, even if it is higher than I normally wear.) Constructing most of the shirt was a no-brainer. The most time-consuming step was, of course, installing the zippers at the side. I’ve never actually sewn an invisible zipper before. It turns out that what everyone says is true—if you have an invisible zipper foot, it pretty much does all of the work for you. When the zippers are done up, they are actually invisible (although there is some reinforcing stitching at the tops of the zippers, per the pattern instructions, so that definitely makes them less invisible). Of course, I intend to wear the shirt with the zippers open, so no one will really appreciate my work, but that doesn’t make me any less pleased with the outcome on my first two invisible zips.

IMG_7656

This is how the shirt hangs when the sides are zipped up

The shirt is fairly short at the front—all the shorter on me than on the model in the magazine because I didn’t do an FBA to add any length for the bust. But I always planned to wear a tank top or something underneath this, so it’s not a big problem. This isn’t the kind of pattern that I see myself making over and over again, but I do like the shape of it, and I’m glad I gave it a try. Plus, now I can mark “invisible zipper” off my sewing-skills-to-learn list!

Ottobre Woman 02/2016 Fog Jersey Blouse

Paprika Onyx Shirt

Behold: my first successful woven garment.

Paprika Onyx Tee

This is the Onyx Shirt from Paprika Patterns. It’s a pretty basic woven tee pattern with a crop top option (thanks, but no thanks). But it has some nice details that I really liked: a slight dropped shoulder, the option for a scooped neckline, and—the big seller—a sleeve cuff and epaulette detail. I ended up making View A with the scooped neck option.

I didn’t make a muslin since it was a pretty basic style and since my fabric was something ridiculous like $2/yard. I did, however, make a few fit alterations before cutting out my fabric. Starting with the size 7, I:

  • Did a 1.5” FBA, rotating part of the dart out to the hem but leaving most of the dart in for a better fit.
  • Added 2” in width to the sleeve. Since I was adding so much width, I had to make some adjustments to the sleeve cap and the length of the armscye. I used this tutorial from The Curvy Sewing Collective, and the adjustments worked out nicely.
  • Blended out to a size 9 at the hip.

For a first go with this pattern, I’m pretty happy with the fit. Next time, I’ll add a bit more width to the back hem so it falls better at the back hip. If you look at the profile view picture farther down the post, you can see that the side seam is unbalanced and is being pulled towards the back.

The fabric is a cotton voile from Fabric.com that has a plaid pattern woven into it. I believe Fabric.com described it as a “shadow plaid.” The texture is a nice alternative for the print-phobic like me. Plus, while I did make an effort to match the horizontal lines of the plaid along the side seams and to center the plaid down the front and back, I didn’t have to worry too much about messing up the plaid matching at the sleeves and such since the plaid design isn’t highly visible. This fabric was very eager to fray, so I used French seams wherever I could and finished the sleeve seams with a 3-step zigzag stitch.

Paprika Onyx Tee

My only complaint with this pattern has to do with the cuffs. The way the cuffs are finished, you end up with an unfinished edge that gets folded down to the edge of the sleeve and that remains invisible so long as the cuffs are in place. But the cuff is only secured by a line of stitching at the sleeve seam and then by epaulette. The end result is that it is pretty easy for the cuff to flip out of place and show the unfinished edge. I recently finished a pair of pants with a cuff that is invisibly secured with a hem stitch. If/when I make this pattern again, I would probably try the same technique on the sleeve cuffs to keep the cuffs from flipping down.

Paprika Onyx Tee

I wasn’t sure I would actually like a woven tee, but I’ve really enjoyed wearing this shirt and I think it looks pretty good on me. I actually wore this with a pair of gray pants for the new faculty orientation at my college and no one gave me side eye. So two thumbs up for that.

Ramona sat at the window watching me like a creeper as I photographed four different projects. Such a nerd.